
If you have an old pair of leggings that are absolutely unwearable, don't worry there's still hope. Make those old leggings into something really special like a fancy pouch!. If you want to do, you can check out our blog. How do you think it? Do you try?
လက္ကိုင္အိတ္ အသစ္တဖန္ျပဳလုပ္နည္း
ဒီလက္ကိုင္အိတ္ေလးကို အားလုံးစိတ္၀င္စားၾကမယ္လို႔ ေမွ်ာ္လင့္ပါတယ္... ကိုယ္မ၀တ္ျဖစ္တဲ့ ေဘာင္းဘီရွည္ကေန ျပဳလုပ္ႏိုင္ပါတယ္.. အသစ္နဲ႔လည္း ရတယ္... ကိုယ္ၾကိဳက္တဲ့ အေရာင္ကို ေရြးခ်ယ္ႏုိင္ပါတယ္.. လုပ္ပုံလုပ္နည္းကေတာ့ ေအာက္မွာ ေဖာ္ျပထားပါတယ္... အရမ္းလည္း လြယ္ကူတယ္ဆိုေတာ့ စိတ္၀င္စားတယ္ဆိုရင္ ကိုယ္တိုင္စမ္းလုပ္ၾကည့္ႏိုင္ပါတယ္...

Read on to find out how!

Grab an old pair of leggings. I think this would be mighty fun if you had a bright pair of leggings too! Maybe even neon. We won’t judge you… :)

Cut it off one side, giving some allowance after the zip ends. This will be the base of your pouch/ pencil case. If your leggings don’t have a zipper, feel free to insert your own if you know how to make a basic zippered pouch. If not, use an old pouch as a base. Cosmetic counters tend to give a lot of these pouches as free gifts during purchase.

You should have something like this. Note that most leggings taper towards the end, so you should cut a straight line at the base to ensure everything remains even.

Cut off another chunk of the leggings and make sure it is at least 1.5 to 2 inches longer than your pouch zipper.

Cut it open and cut out strips. The width of the strips depends on how thick you want each braid to be.
In this instance, I used strips of about 1 inch in width (using eyeball power of course. If you want it to be exact and perfect, you can use a ruler and mark it out with a pen or chalk).

Pile three strips together, pin the top and start braiding, the same way you would if you had pigtails. :)
I may be taking it for granted that everyone knows how to braid. So if you need detailed instructions in another tutorial, please feel free to let me know!

You should end up with something like this.

Make as many braids as you need to fill up the sides of the pouch. In this case, I used four as I wanted a slimmer case for pencils and pens.
If you want a deeper pouch, sew on more fabric to the side walls and continue adding on more braids!

Stitch the braids down onto the fabric underneath. The important parts to stitch are the sides of each braid to hold them down, and the top and bottom of each braid row. You’ll want to make small stitches on the outside and use similar colored thread so it’s not obvious.
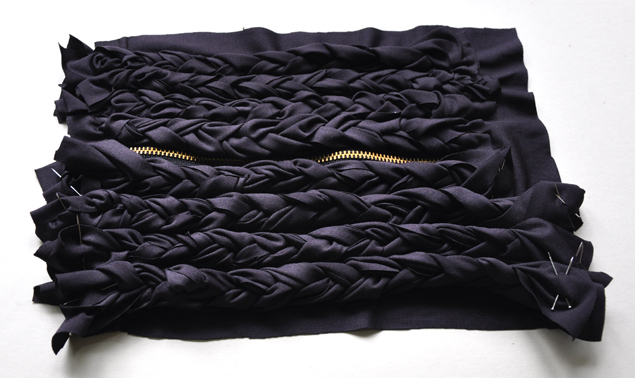
Repeat for the opposite side. If you’re feeling lazy you could get away with just one side too of course ;)

Now close the zipper to about the halfway mark and flip the pouch inside out. Sew all around to form your pouch shape.

Once you’re done with stitching all around, cut off the excess edges. Be careful not to cut any threads as everything will unravel! I didn’t insert a lining in this, but you can if you want to make it even prettier.

Flip it back to the right side and you’re done! The braids also provide some cushioning in case you have more delicate items to place inside.
No comments:
Post a Comment