
ကဲ.... ဒီေန႔ေတာ ရိုးရိုးေလးနဲ႔ လွပေအာင္ ျပဳလုပ္တဲ့ အိတ္ေလးပါ.. ကိုယ္မ၀တ္ျဖစ္တဲ့ အက်ီ ၤေလးကို ဒီလိုလွပတဲ့ အိတ္ေလးရေအာင္ ျပဳလုပ္ႏိုင္ပါတယ္....အားလုံးအတြက္ အဆင္ေျပပါေစ..


You will need:
Old sweatshirt
Coordinating ribbon - 1.5" wide black grosgrain
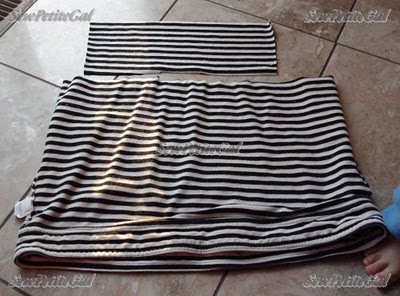
1. Lay out and flatten your shirt. Cut straight across right under the sleeves for the body of your tote
2. Cut a rectangle (the biggest one you can manage) from the back of your shirt.
3. You should now have the tote body from step 1 plus the rectangle from step 2. The rectangle will serve as your tote bottom.

4. Center your rectangle to your tote body (unfinished side) and pin tote bottom in place. It's easiest to pin the longer sides first and then pin the short sides. Now sew where you've pinned it.
5. Cut your tote handle from your sleeves. I sewed my sleeves together to form a 35" by 5" rectangle and folded it in half long ways (wrong side out). I then sewed the long edge and flipped it inside out (right side out).

6. Attach your tote handle to each side of your tote. I sewed 2 lines of stitching for extra security.
7. (Optional Belt Loops) I cut 2.5" x ~0.75" pieces for each of the 4 belt loops. Fold in half long ways (wrong side out) and sew down the long edge. Flip inside out

8. Thread ribbon through belt loops. Bag can be used as tote (as seen on the left) or ribbon can be pulled to cinch the bag (as seen on the right).
Oh! You're finished!


No comments:
Post a Comment